关于Allure2 + Pytest 组合生成的测试报告之前在公司组内也有做过分享,今天在blog这边在记录一下。
这边分为5个步骤,系统是macOS 10.12,这边不涉及环境配置比如Python、Java环境。
Step1: 安装依赖包
- Pip install pytest
- Pip install allure
- Pip install allure-pytest
- Pip install allure-python-commons
*macOS 不建议在brew环境安装第三方依赖,路径问题会导致各种异常。
Step2: 创建项目
创建项目Demo
report下面2个目录是分别存放2个格式的测试报告,默认pytest执行的用例结果放在xml下,是json格式的,需要命令转换成html格式的测试报告存放于xml下。
Step3: 设计用例原则
- 文件名以test_.py文件和_test.py
- 以test_开头的函数
- 以Test开头的类
- 以test_开头的方法
- 不支持类init初始化 可使用@pytest.fixture()
testcase:校验登录接口返回
1
2
3
4
5
6
7
8
9
10
11
12
13
14
15
16
17
18
19
20
21
22
23
24
25
26
27
28
29
30
31
32
33
34
35
36
37
38
39
40
41
42
43
44
45
46
47
48
49
50
51
52
53
54
55
56
57
58
59
60
61
62
63
64
| # @File:test_02.py
# @Author:2zyyyyy
# @Time:2019年04月25日
# @Explain:
import allure
import json
import requests
import pytest
class TestDemo:
@staticmethod
@allure.step('post 请求获取接口返回结果')
def login():
url = 'http://192.168.0.000:8071/auth-service/login'
headers = {
'Content-Type': 'application/json;charset=UTF-8'
}
payload = {
"userMobile": "00000000000",
"systemId": "000",
"terminalType": "000",
"password": "000000"
}
response = requests.post(url=url, data=json.dumps(payload), headers=headers)
result = response.json()
result_dict = dict()
result_dict['code'] = result['code']
result_dict['description'] = result['description']
return result_dict
@allure.feature('登录功能')
@allure.story('验证参数1')
def test_01(self):
"""
校验返回值是否为0000
"""
with allure.step('获取请求返回的code值'):
code = TestDemo.login()
with allure.step('校验结果'):
allure.attach('期望结果', '0000')
allure.attach('实际结果', '0000')
assert code['code'] == '0000'
@allure.feature('登录功能')
@allure.story('验证参数2')
def test_02(self):
"""
校验description是否为oh yeah,通过了
"""
with allure.step('获取接口返回的description'):
desc = TestDemo.login()
with allure.step('校验结果'):
allure.attach('期望结果', 'oh yeah,通过了')
allure.attach('实际结果', 'oh yeah,通过了')
assert desc['description'] == 'oh yeah,通过了'
if __name__ == '__main__':
pytest.main(['-s', '-q', '--alluredir', '/AllureDemo/report/xml(json格式结果存放路径)', 'test_02.py'])
pytest.main(['allure', 'generate', '/AllureDemo/report/xml(json格式结果存放路径)', '-o', '/AllureDemo/report/html(html格式结果存放路径)'])
|
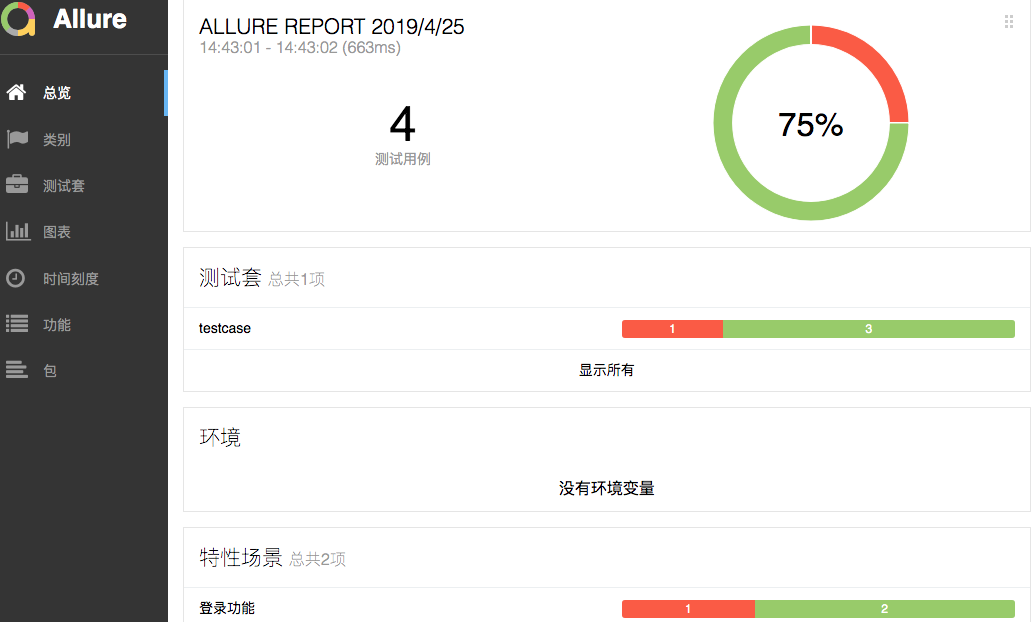
一个登录,2条用例。main里面的2个命令分别执行用例生成结果,最后将json结果转换HTML格式。
Step4: 生成Allure测试报告
一共有2步 先生成json格式的在转换成HTML格式
①在项目终端执行pytest –s –q –alluredir [XML格式文件夹]
②第一步没有异常执行allure generate ./report/xml -o ./report/html –clean
第一个目录是生成XML格式报告的路径 第二个目录是生成HTML报告的路径
Step5: 查看测试报告
打开./report/html/index.html 选择浏览器打开

Pytest命令拓展
pytest -v [caseDir] # 运行指定目录中所有用例
pytest -v [caseDir]/test_01.py 运行指定文件中的所有用例
pytest -v [caseDir ]/test_02.py::TestDemo 运行指定文件中的测试类
pytest -v [caseDir ]/test_01.py::test_001 运行指定测试用例函数